Have you ever wanted to transfer some files from work/school to home, but you forgot your USB flash drive? But you’re an iPhone user right? Here’s how to store files on your iPhone just as if it was a regular USB flash drive or hard drive.
DiskAid is a great program that allows your iPhone (or iPod Touch) to go into “Disk Mode.” In other words, your iPhone becomes visible like a USB disk – drag and drop files to and from it. Note that this program works on Windows (XP SP2+, Vista, 7) and Mac OS X (10.4 or higher) and requires iTunes 8.2.1.
UPDATE: I just noticed that this is a 14 day trial, so keep that in mind. The previous version that I downloaded did not have a time restriction. If you like the program, their website lists the license cost at $9.90, which isn’t too bad. Please note that I am not affiliated with the company, DigiDNA in any way.
Do you have any iPhone tips or tricks to share? Leave a comment below. Thanks for stopping by.
If you’re listening to music or an audio podcast and the passcode screen lock kicks in on your iPhone, you can still control the audio without entering your 4-digit PIN code to unlock it.
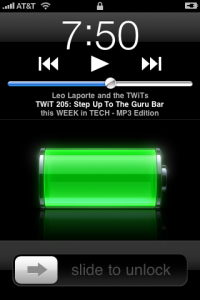
Instead of entering the passcode, double-click the home button (the only physical button on the face of the iPhone.)
You will see a screen similar to this:

Figure 1: Locked Screen on the iPhone with Podcast Controls
The controls let you pause or go to the previous or next track or next podcast. Of course you can also control the volume at any time using the up and down buttons on the side of your iPhone, even when the screen is black.
That is all there is to it. You can now control your music and podcasts without entering in your passcode to unlock the screen.
Do you have any other tips or tricks to share? Please leave a comment below. Thanks for coming by.
Quick Tip: Email Your iPhone Photos in Full Resolution
So you have an iPhone, and it takes decent pictures. But when emailing directly from you iPhone, your photos get resized automatically to 800×600. This is usually not really a bad thing since the file size is smaller and can be emailed faster, but sometimes you want to send the original full resolution photo. Here’s how to do it:
- Go to your Camera Roll.
- Press and hold your finger down on the image you want to email until a Copy balloon appears. Click “Copy” – the balloon should turn blue.

Figure 1: Copy the picture from the Camera Roll
- Bonus: If you want to select multiple photos to email, from your Camera Roll, click the box/arrow icon in the lower left corner of the screen. Select the photos you want, and then tap the Copy button.

Figure 2: Copy Multiple Photos
- Use the home button to return to the home screen.
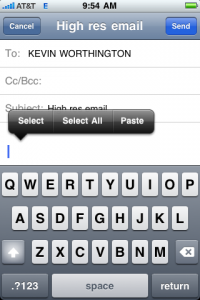
- Start up Mail and compose a new email.

Figure 3: Compose the email and select Paste
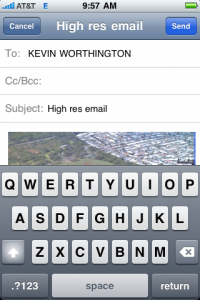
- Paste the photo(s) into the new message.

Figure 4: The full res photo in the email
That’s it! Instead of small, automatically resized pictures, you will have the full resolution versions.
If you’re wondering how to do screen captures from an iPhone, check out the previous post: Grab a Screen Capture / Screenshot of your iPhone or iPod Touch.
Do you have any other tips or tricks to share? Leave a comment below. Thanks for stopping by.
Did you ever see a really cool image or even a glitch on your iPhone or iPod Touch, and you wanted to save it to show someone else? Or maybe you wanted to check it out again later? Well, it IS possible. In fact, you can take a screen grab/capture (screenshot) of any application from your iPhone/iPod Touch. I thought this was something that most iPhone/iPod Touch users already knew, but recently I’ve taught several people how to do this. So I’ve decided to write this Quick Tip. Ready to take some screenshots? Here we go:
First, be aware that you need at least firmware version 2.0 to take screenshots. If you don’t already have at least version 2.0, you can connect your device to iTunes and update the firmware.
Easy directions:
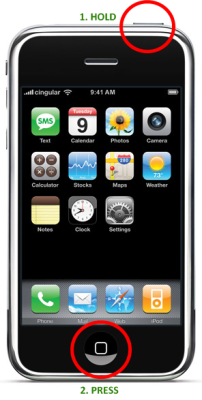
1. Hold down the home button and then press the top button.
2. The screen will flash as feedback that the screenshot was taken.
3. Go to your camera roll to view the screen grab.
Image depicting the procedure:

The no-nonsense way to take a screenshot on your iPhone / iPod Touch
Here are my favorite free and easy to use update checker applications for Mac OS X and Windows. These small programs scan your computer for the latest software updates to keep your system up to date. Although these programs work great and have been tested extensively, please make sure you have a working backup of your system before running these update checkers.
For Mac OS X:
AppFresh is a useful program for updating all applications, widgets, preference panes and application plugins. It scans for both Apple applications and third-party software on your computer, and then does an online check if there are available updates. You can then download and install the updates from within AppFresh. Please note that if you only want to update Apple software, you can run OS X’s Software Update from the Apple menu in the top left of your desktop.
For Windows:
File Hippo’s Update Checker performs similarly to AppFresh – you run a small desktop app, then it communicates to the File Hippo servers and displays an updates list. It can show beta program updates, and even the install path on your system for each program. Note that this does not check for Microsoft program updates – it only checks for third-party software updates. For Microsoft products, open up Internet Explorer and visit Microsoft Update.
For further reading and updater alternatives for Windows, visit: (dead link as of August 2021 – it was http://www.techsupportalert.com/best-free-software-update-monitor.htm) Best Free Software Update Monitor.
If you have an alternative update checkers that you like or have any questions or comments, please enter it below.
This is a quick reference for you for when you want to watch all of your downloaded unplayed podcasts consecutively in iTunes without any breaks or user intervention. Ready? Here we go:
- Make sure that the Shuffle setting is turned off. Bad things may happen if the Shuffle setting is on. Just trust me on this.
- Create a new smart playlist by clicking File -> New Smart Playlist.
- Change the options to say “Match all the following rules”: “Podcast is true.”
- Click the plus sign to add another rule and set it to: “Play Count is 0.”
- Make sure “Live Updating” is checked, then click OK.
- Name it something appropriate like “Unplayed Podcasts.”
Using this method will play one podcast after another without user intervention. I hope you find this useful.
Got any other tips or tricks to add? Leave a comment below. Thank you for visiting.
Just a quick poll:[poll id=”2″]
Nginx for Windows native builds are now being provided by nginx.org.
The last available Nginx for Windows build that I created using Cygwin was Nginx for Windows 0.7.50, the full page of my builds are located here: Nginx For Windows. Updated September 29, 2009.
So if you have not already noticed, read, or heard, there are now native Nginx for Windows builds. You can grab them from http://nginx.net. As of this writing, the latest version is 0.7.59.
Thanks for downloading my non-native Cygwin builds. Stay tuned for future projects. I have a few ideas in the pipeline, I’ll be sure to mention them as they become available.
PLEASE NOTE: Native Nginx Windows builds are available at http://nginx.net
(My announcement was here: Nginx for Windows Native Builds.)
The full page of my builds are located here: Nginx For Windows. Updated September 29, 2009.
Full disclosure: This site is ad-supported – please support it by supporting the sponsors.
Nginx 0.7.50 for Windows is now available. For build information, please read the README.txt in the install package, and the notes on the Nginx for Windows download page.
Please note that due to quick upstream bugfix releases, there were not Nginx for Windows releases 0.7.48 or 07.49. The previous version in this branch was 0.7.47, and an upgrade to 0.7.50 is recommended.
I hope you find this software useful, although it is offered without support and without guarantees.
To get immediate notifications for new Nginx for Windows releases and for more technology related news, Subscribe to my RSS feed and follow me on Twitter.
Download Nginx for Windows 0.7.50 here. Changelog.
Nginx 0.6.36 for Windows is now available. For build information, please read the README.txt in the install package, and the notes on the Nginx for Windows download page.
SSL support is now included. Please report any bugs.
I hope you find this software useful, although it is offered without support and without guarantees.
To get immediate notifications for new Nginx for Windows releases and for more technology related news, Subscribe to my RSS feed and follow me on Twitter.
Download Nginx for Windows 0.6.36 here. Changelog.
